Share features in Angular using libraries and npm link
A streamlined guide to setup your workspaces to work smoothly on shared features for multiple Angular projects, using Angular libraries and npm-link.
Disclaimer: Our Tech Blog is a showcase of the amazing talent and personal interests of our team. While the content is reviewed for accuracy, each article is a personal expression of their interests and reflects their unique style. Welcome to our playground!
Introduction
When dealing with an ecosystem of Angular applications, the need to share features between them sometimes arises. Not all projects are born in the same way, and especially when the applications are not versioned within the same Angular workspace, it can be hard to move an implementation from one repository to another.
As developers, we abhor copying and pasting code in these scenarios because we know from experience that dealing with duplicated code:
- mistakes are made, especially on everything that can only be spotted at runtime
- the backport process is slow, because it forces us to go through all the commits involved in the implementation and extract the lines that we need to move
- the same features could be changed in more than one project at the same time, for various reasons, making it even more challenging to keep them aligned without perfect management of the process
So can we improve this situation, even a little bit?

Angular libraries
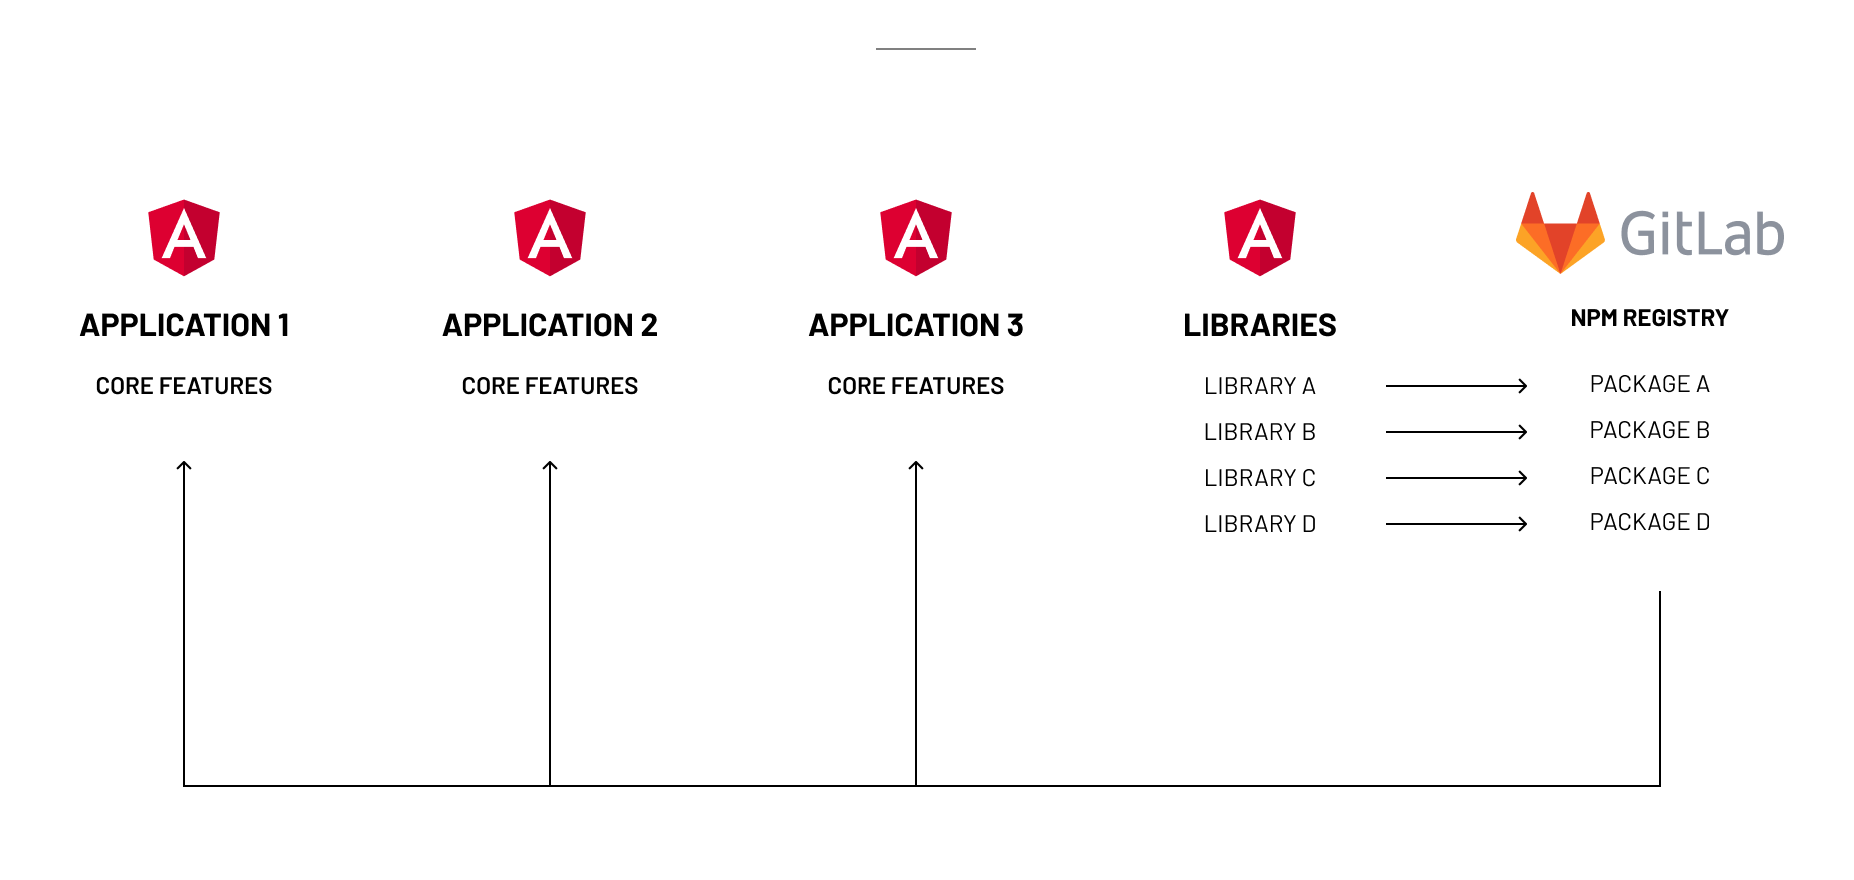
Some possible strategies can be put in place, one of which is to separate these features into Angular libraries and share them across your ecosystem using private npm packages or a private registry solution such as the Gitlab NPM Registry.
Using Angular libraries in this scenario is basically a two-part process:
- isolate the features into individual libraries
- test and debug them into your applications
And then
- build an NPM package distribution for your libraries
- publish the packages to your registry
- pull the packages of your library into the desired projects
We are not going through this entire process right now - we could in the future - we will instead focus on the first part.
An overview of the project’s structure
In our example we will start from the most straightforward scenario - one application and one library - and leverage the Angular official documentation to make it as straightforward as possible.
We need a main project that will be an Angular application, and a libraries project for our first library and any others we create in the future.

The problem with working smoothly with libraries
The main problem in isolating your features in libraries whose source code resides outside your applications is that you need a way to develop, test and check your code in an easy way when you are actively working on them.
Two of the most important things we can’t live without as developers are a watcher to compile our application as we make changes and the possibility to debug by inspecting the source code from the browser.
We know we can run a development server in the background and a watcher that compiles our code as we change it both in our Angular main project and our libraries project. But how can we consistently share the Angular library code with the Angular application?
Of course we need to avoid going through the tedious process of changing your libraries, building them, pushing them on a registry, and pulling them on the target application over and over again.
A valuable tool to solve this scenario is npm-link, that will allow you to simulate the introduction of a package or library in the development stage of your project.
Let’s wrap up a solution example using what we discussed so far and leveragig npm link to make it work.
The npm link solution from scratch
This simple guide was tested with node v16, npm v9 and Angular v16.
First, we need to create the main project and run the development server.
ng new angular-main
cd angular-main
ng serve
Then we need to create a project for the libraries, and create a new library This project doesn’t need to be an application, we need it to be the container for our Angular libraries.
ng new angular-libraries --no-create-application
cd angular-libraries
ng generate library my-lib
This will scaffold the code of a new library, and now we need a built version or a watcher running that can produce a built version of the library each time we make an update. Both could be achieved with the ng build command, the second in particular using the --watch flag. Let’s start the watcher for this example.
ng build --watch
This command will create a new dist/my-lib folder and now any changes done on the my-lib library will generate a new build of the library inside of it.
The library now contains a MyLibComponent inside the MyLibModule module.
Connect the application to the library with npm link
Let’s see how we can now connect the two parts and what are the two main things to be corrected to make this work.
NPM Link is basically used to create a symlink between the library dist folder and the application node_modules folder, and add it to the application package.json as a dependency. In a nutshell this is all it does, so it is pretty simple. Let’s try it.
LIBRARY
In the library project, we must launch npm link from the library dist folder. Note that we are not accessing simply the dist folder, but the library folder inside.
cd dist/my-lib
npm link
This will make npm link memorize the library’s location to be connected to the application.
MAIN
In the main application, we then execute npm link followed by the name of the package, as we were using npm install.
npm link my-lib
At this point, the library is inside the application as an npm package, so you should be able to import the MyLibModule inside the application and use the MyLibComponent as you would typically do.
Note: the npm link documentation suggests to use
npm install <dep> --package-lock-onlyfor new dependencies, but for the sake of our example npm link will work in the same way.
We need to fix a couple of things at this point.
Fixing the symlinks
First and foremost, the application will compile as you save your changes and reload, however you will see this error in the console.
Cannot read properties of null (reading ‘bindingStartIndex’)
This is due to a missing configuration that you need to add to your angular.json inside the main project, within the build options.
projects.angular-main.architect.build.options.preserveSymlinks: true
This will ensure that Angular can properly read the library’s dependency inside the node_modules folder by following the symlink created by npm link.
Since you changed the angular.json file, remember to restart your main project server.
Adding some debugging
Now one important thing to do is to enable the ability to follow the source code of your library from the main application, for example when errors pop up in the console.
To do so, you must populate the following tree in the angular.json file in the main project.
projects.angular-main.architect.build.configurations.development.sourceMap
The vendor property set to true is what will allow the inspection of the source code from the browser using the library source maps.
{
  [...]
  "projects": {
    "angular-main": {
      [...]
      "architect": {
        "build": {
          [...]
          "configurations": {
            [...]
            "development": {
              [...]
              "sourceMap": { "scripts": true, "styles": true, "hidden": false, "vendor": true },
              [...]
            }
          },
        }
      }
    }
  }
}
On the libraries project, on the other hand, check that in the tsconfig.lib.json check that the option declarationMap is set to true.
{
 [...]
  "compilerOptions": {
    [...]
    "declarationMap": true,
    [...]
  },
  [...]
}
Unlink the main project
Once you have tested the library and are ready to publish it to a package registry, it is also time to detach your main project from the library.
To do to, in the main project, launch:
npm unlink my-lib
This will delete the dependency from the node_modules folder and remove my-lib from your package.json.
At this point, you can publish your project to your selected registry and install it with npm i as you would usually do.
Known problems
Even though this solution is relatively smooth, some known issues should be made clear from the beginning.
In particular, npm link is far from a perfect tool, even if it seems there are a few alternative strategies to its use. Some common know issues include:
- if you interrupt the watcher on the library, npm-link will stop working, and you need to reinstate the link again after starting the watcher again
- once the watcher is running - more often than not - you need to reload VScode or you will see the imports of the library on your main application broken
npm linkis available on v6 of npm, but in our tests we could make it work only from v7 or more
Useful links
- Angular build –watch flag is vital to make your daily job easier and smooth
- The caveat section of the npm link documentation reports some useful tips on how to best use it in various situations
- Npm cross link is a tool to speed up the use of npm link
- Linx is an alternative to npm link as an attempt to overcome some of its limitations
Conclusions and alternative scenarios
In some of our projects, when multiple Angular applications share many features, npm link has proved to be a handy solution because it allows us to quickly plugin a library ad test an advancement of it in an actual situation instead of a test application.
Having individual repositories for the applications and for the libraries, however by itself carries - as you can imagine - some issues of its own: you will need to manage pull requests on multiple projects at the same time and be sure to properly version your libraries and write good changelogs so that all your applications can use them with efficiency.
In some cases, you could even decide to merge your repositories in one mono-repo and use specific tools such as Lerna, or use one single Angular workspace so that you can import the libraries from source code on different applications, or opt for a hybrid solution.