Integrate external secrets management systems in Kubernetes
How to manage our Kubernetes secrets with AWS Secrets Manager as a single source of truth with External Secrets Operator
Disclaimer: Our Tech Blog is a showcase of the amazing talent and personal interests of our team. While the content is reviewed for accuracy, each article is a personal expression of their interests and reflects their unique style. Welcome to our playground!
Introduction
Managing secrets in our Kubernetes project is always hard work, with a lot of coffee, discussions, best practices and sometimes beers.
Many providers offer centralized solutions for secrets management, like AWS Secrets Manager, HashiCorp Vault, Google Secrets Manager, Azure Key Vault and many others.
In this post we will see an example about how we can manage our Kubernetes secrets with AWS Secrets Manager as a single source of truth with External Secrets Operator in a AWS Elastic Kubernetes Service.
External Secrets Operator extends Kubernetes with Custom Resources, which define where secrets live and how to synchronize them. The controller fetches secrets from an external API and creates Kubernetes secrets. If the secret from the external API changes, the controller will reconcile the state in the cluster and update the secrets accordingly.
The birth of the project, kicked off by Container Solution, is worth a reading. You can have an idea here GoDaddy and here External Secrets Community
Prerequisites
During the example we’ll create a Kubernetes cluster in AWS Elastic Kubernetes Service and a sample application that uses secrets stored in AWS Secret Manager.
We’ll use Terraform to manage our infrastructure, the whole example source code can be found in this repository.
Before we start, let’s make sure we meet these requirements:
- An AWS account and an IAM user with full permissions
- Docker installed and running on your local machine
- A basic knowledge of Terraform
Note: the project is NOT a production ready code, keep it as an example on how we can use an external secrets manager.
Deploy project
Clone the project from example repository and copy env.template to .env file and use your IAM user credentials to fill AWS_ACCESS_KEY_ID, AWS_SECRET_ACCESS_KEY and AWS_DEFAULT_REGION variables.
Build the docker container using the make command, after successfully building type make cli, this is the cli we use to interact with the cluster.
The file terraform.tfvars contains some basic configuration of our infrastructure resources.
Use the following commands to initialize the terraform project and to provision the cluster:
$ terraform init
$ terraform validate
$ terraform apply
VPC
Looking at main.tf file, in the first step we create our VPC that spans two AWS Availability Zones.
module "vpc" {
  ...
  name = "${var.cluster}-vpc"
  cidr = var.cidr_block
  azs = var.azs
  private_subnets = var.private_subnet_block
  public_subnets = var.public_subnet_block
  enable_nat_gateway = true
  single_nat_gateway = true
  one_nat_gateway_per_az = false
  enable_dns_hostnames = true
  ...
}
Cluster setup
Next we create the kubernets cluster
module "eks" {
  ...
  cluster_name = var.cluster
  cluster_version  = "1.21"
  vpc_id  = var.vpc_id
  subnets = var.subnets
  cluster_endpoint_private_access = true
  cluster_endpoint_public_access = true
  cluster_endpoint_public_access_cidrs = ["0.0.0.0/0"]

  # Enable OIDC Provider
  enable_irsa = true
  write_kubeconfig = true

  node_groups = {
    core = {
      desired_capacity = var.node_desired
      min_capacity     = var.node_min
      max_capacity     = var.node_max

      instance_types = var.node_instance_types
      capacity_type  = "ON_DEMAND"
      subnets = var.subnets
      disk_size = 8
    }
  }
  ...
}
Now we create a namespace for the sample application.
resource "kubernetes_namespace" "namespace" {
  metadata {
    labels = {
      Cluster = var.cluster
    }
    name = var.project
  }
}
Create a IAM role with AssumeRoleWithWebIdentity permission.
resource "aws_iam_role" "service_account" {
  name = "${var.cluster}-${var.project}-ServiceAccoutRole"
  assume_role_policy = templatefile(
    "${path.module}/files/iam-role.json",
    {
      oidc_provider_arn = module.eks.oidc_provider_arn
      cluster_oidc_issuer_url = replace(module.eks.cluster_oidc_issuer_url, "https://", "")
      service_account_namespace = var.project
      service_account_name = "${var.project}-eso"
    }
  )
}
Then we create a service account in the application namespace and annotate it with role arn created.
apiVersion: v1
kind: ServiceAccount
metadata:
  name: ${service_account_name}
  namespace: ${namespace}
  annotations:
    eks.amazonaws.com/role-arn: arn:aws:iam::${account_id}:role/${iam_role_name}
Now we create an AWS Secrets Manager resource and an IAM policy with readonly permission to access it, then we attach the policy to the service account role so it can read secrets stored in AWS Secret Manager.
resource "aws_secretsmanager_secret" "secret" {
  name = var.project
  recovery_window_in_days = 0
}

resource "aws_iam_policy" "access_secrets" {
  name = "${var.project}-AccessSecrets"
  path = "/"

  policy = templatefile(
    "${path.module}/files/iam-policy.json",
    {
      aws_sm_secret_arn = aws_secretsmanager_secret.secret.arn
    }
  )
}

resource "aws_iam_role_policy_attachment" "access_secrets" {
  role = var.service_account_role
  policy_arn = aws_iam_policy.access_secrets.arn
}
External Secrets Operator
External Secrets Operator provides different modes of operation to fulfill ogranizational needs, Shared ClusterSecretStore, Managed SecretStore per Namespace and ESO as a Service, which I used in this example.
In ESO as a Service, every namespace is self-contained. Application developers manage SecretStore, ExternalSecret and secret infrastructure on their own. Cluster Administrators just provide the External Secrets Operator as a service.

Complete reference is available in the official documentation.
Using helm, we install the External Secrets Operator
resource "helm_release" "external-secrets" {
  name       = "external-secrets"
  chart      = "external-secrets"
  repository = "https://charts.external-secrets.io"
  namespace  = "external-secrets"
  create_namespace = true
  version    = "0.3.11"
}
We define the SecretStore resource, the SecretStore is namespaced and it specifies how to access the external API. We then specify the service account (previously created) to be used.
apiVersion: external-secrets.io/v1alpha1
kind: SecretStore
metadata:
  name: secretstore-example
  namespace: example
spec:
  provider:
    aws:
      service: SecretsManager
      region: eu-west-1
      auth:
        jwt:
          serviceAccountRef:
            name: example
Once we create the ExternalSecret resource, the ExternalSecret describes what data should be fetched, and how data should be transformed and saved as a Kind=Secret resource. In the spec.target we specify which secret resource name should be created and which secret manager store should be used and stored in the secret.
apiVersion: external-secrets.io/v1alpha1
kind: ExternalSecret
metadata:
  name: externalsecret-example
  namespace: ${namespace}
spec:
  refreshInterval: 1m
  secretStoreRef:
    name: secretstore-example
    kind: SecretStore
  target:
    name: example-secret
    creationPolicy: Owner
  dataFrom:
  - key: ${namespace}
Our EKS cluster and all resources should be up and running. Typing the following command we can configure kubectl to access the cluster:
$ aws eks update-kubeconfig --region REGION --name CLUSTER_NAME
AWS Secrets Manager
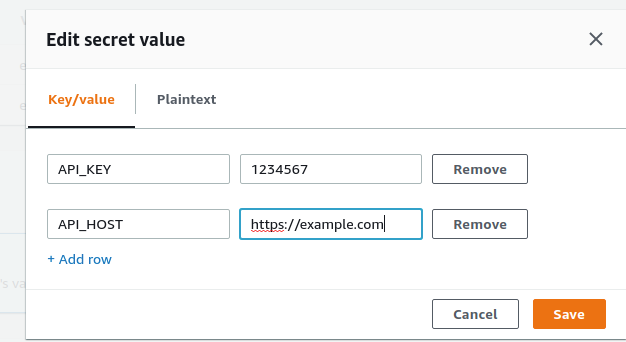
As next step, we access our AWS account console and go to AWS Secrets Menager page, where we can see the empty secrets created from terraform, in our case “example”. We create a few example secrets values, for example “API_KEY” and “API_HOST”.
It’s time to verify that ESO is working as expected.
The ESO should have created the kubernetes secret resource “example-secret” and should contain all secret keys.
$ kubectl get secret -n example
NAME                                     TYPE                                  DATA   AGE
example-secret                           Opaque                                2      15m

kubectl get secret example-secret -n example -o jsonpath='{.data}'
{"API_HOST":"aHR0cHM6Ly9leGFtcGxlLmNvbQ==","API_KEY":"MTIzNDU2Nw=="}
Our secret is at last synchronized with the secret in AWS Secrets Manager: if we change the secret value or add a new secret value in the AWS console, the secrets in Kubernetes will be updated.
Tips
When you update or rotate the secrets value, ESO update the secrets value, but deployment already deployed did not see the changes, Reloader could be a good solution to perform a rolling upgrade when change happens in our secret.
The example repository contains the Reload installation and a sample deployment yaml file.